Hi this is Cheryl with Superior Stencils and our Stencil Tile Floor project is now completed and I'm happy to say a complete SUCCESS!
Our customer wanted her outdated Kitchen Tiles Stenciled since she'd recently had a remodel of her kitchen space.
First we used Krud Kutter to totally clean the floor which is necessary to remove any grease or grim so the paint sticks without any issues and it worked GREAT!
Once we were were assured the floor was perfectly cleaned we examined the customers choice of paint products from Rustoleum called "HOME" which comes as a 2 part Kit. The first can was the background color and the 2nd can was the clear sealer. (Both products worked PERFECTLY and we grade at A+).
We used painters tape around all the floor trim to protect it from keeping our paint and sealer from making contact with the wood trim. Next we did our cut work using a 2" angled brush with the white background paint from can #1. (The customer chose bright white to compliment her backsplash tile in her kitchen).
Once the cutwork around the edges of the floor was dry we applied a 2nd coat. After 4 hrs. we began rolling out the main floor starting at the left edge to the right painting small sections at a time so the paint remained smooth and covered both the tile and the grout lines.
We allow this paint to dry for 4 hrs. then applied a 2nd coat which was necessary to fully cover the old dated brown tiles. We let this dry overnight to make sure it had plenty of drying time with "NO FLOOR TRAFFIC".
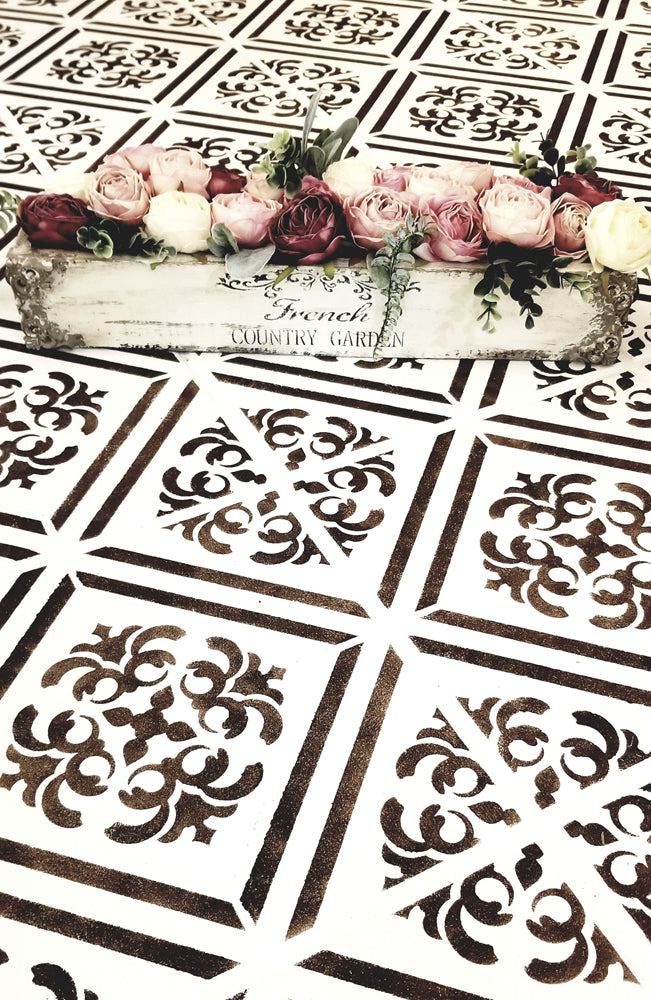
The next morning we prepared the Tile Stencil Design selected by the customer from Superior Stencils Tile Selection called "ITALIA" found here https://superiorstencils.com/products/italia-tile-stencil-floor-tile-stencil
This design really was a beautiful choice for this space as the backsplash, cabinets and kitchen space had an Old World feel.
The customer chose a Behr interior paint in dark brown color to match her Rubbed Oil Bronze hardware. We measured her tiles carefully and confirmed what she believed to be 13.25" x 13.25".
After laying the tile stencil over the top of a Full Sized Tile we did our first test stencil and it fit PERFECTLY. We stenciled all the Full Sized Tiles first in each row <Left to Right > throughout the entire room.
NOTE: We made sure to tape down the corners of each tile along the way to ensure that no paint would get under the stencil. We loaded our brush with paint and then tapped off the excess. There were several tiles that we went over twice to make sure they were dark enough.
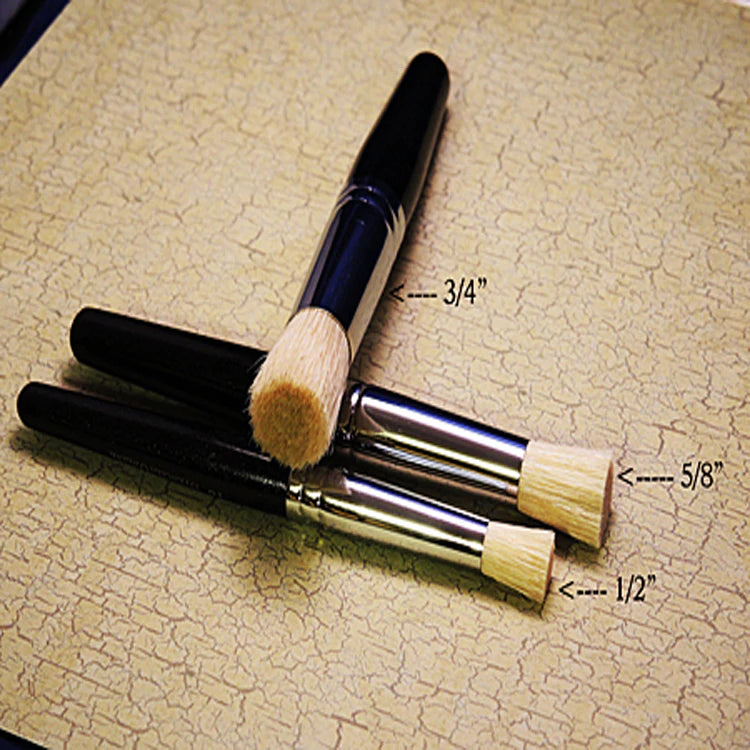
One thing we did discover was that it was easier to use several brushes instead of just one because of the build up from the stencil paint. When the brush seemed to become stiff we cleaned it with warm water and allowed it to dry, continuing with a new brush. In all we used 3 new brushes for this project.
The brushes held up like a CHAMP! You can also use a roller but run the chance of pushing too hard and releasing too much paint under the stencil so we opted to use brushes which gave us more control over the amount of paint we used.
The customer wanted little of the white background paint to show through the design so the Tiles looked Vintage.
Once we completed all the large Tiles we started on the edges of the room. The edges of the tiles in her room were cut smaller, so the Tile Stencils would have to be cut an adjusted to fit, taking the most time that's why we decided to leave this tedious work after we stenciling the "Full Size Tiles".
We were lucky that the tile layer stayed fairly consistent with the sizing of the edges so we only had to cut down a couple of tile sizes. The customer did email us those sizes before we arrived so we were able to bring a couple of stencil designs that were cut down to fit those outer edge tiles.
Finally after two days of stenciling we were ready to apply the clear coat. We lightly dusted over the cured floor to make sure there was no dust. It was time to open can #2 the sealer. It was a milky white but dries clear.
We first sealed the outer edge with an angled brush and let it dry. Then after 2 hrs. applied a 2nd coat to the outer edges of the entire room.
We poured the sealer in a paint pan and used a 1/4" roller to roll it over the entire floor. We look small sections allowing the sealer to roll into every crack and crevace to make sure the floor was completely covered.
We allowed this to dry for 2 hours which is how long it took to make certain it was completely dried then applied the 2nd coat. After 2 hrs. we wore clean socks to check the floor first checking the entrance into the kitchen then throughout the room and walla it was FINISHED!
A NEW Beautiful floor! The customer rushed in and was so happy she cried as did we because it was a wonderful project that went just as planned.
NOTES I can offer to you:
1. You should use more than 1 Stencil with rooms other than bathrooms.
2. Purchase more than 1 stencil brush. We used 3.
3. Check out other paint companies and read all the reviews. Rustoleum's Krud Kutter and HOME paint certainly made our list of providing a great product! A+.
4. We suggested that the HOME OWNER purchased furniture pads for their chairs and table to protect their beautiful floor from getting scratched even though we applied 2 coats of sealer.
We hope this blog inspires you to take the step to cover your ugly tiles and get ready to be AMAZED as we are.- Cheryl / Superior Stencils